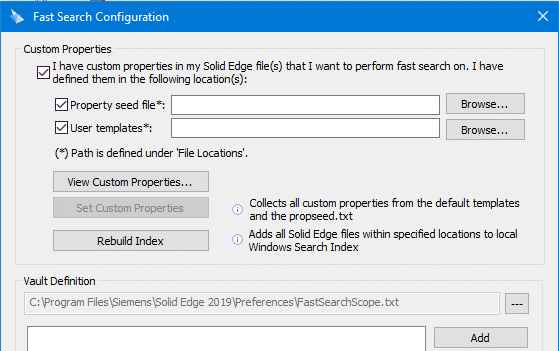
Configure Fast Search
-
If you have custom properties already defined in your QY CAD files, select I have custom properties in my QY CAD files that I want to perform fast search on. I have defined them in the following locations:

-
Define a shared location for the property seed file (propseed.txt) or user templates by browsing to the location of each type of file.
-
To collect all custom properties from the default templates and property seed file, click Set Custom Properties.
Note:The property seed text file and user templates can be centrally stored on a network share. Users on client machines should have local administrator permissions and write access to the share. If permissions are not available, a domain account should be created that has write permissions to the share, as well as local administrator permissions. When setting options on a client machine, the system will prompt users for the administrator credentials.
-
To validate that all your common properties are captured, click View Custom Properties.
To learn more about custom properties, see Create custom document properties.
-
-
To specify a different FastSearchScope.txt file than the one displayed in the Vault Definition box, click the Browse button
 , and then select a new file.
 For more information about the FastSearchScope.txt, see Define a QY CAD vault.
-
To add a vault location, click Add and then select the file locations that contain QY CAD files.
It is best to simply choose the top-level folder that contains all of your QY CAD files.
We recommend that you do not add any shared locations as mapped drives. Instead, enter the UNC path to those shared locations, such as \\<server_name>\<shared_location>. For example, \\MyServer\Engineering\, not Z:\Engineering\.
If not already indexed, QY CAD automatically indexes the newly added location.
-
(Optional) To index file contents in addition to file properties:
-
In Windows Explorer, right-click the top-level folder you chose to index, and then select Properties.
-
Click Advanced.
-
Select Allow files in this folder to have contents indexed in addition to the properties and then click OK.
-
-
To remove a vault location, select an entry from the list, and then click Remove.
QY CAD also removes the location from the Windows Indexer.
-
To install and run the QY CAD Monitor Windows Service and detect duplicate Solid Edge file creation in real time, select Detect duplicates by tracking Copy and Paste in Windows Explorer.
-
To verify that QY CAD file types will be indexed:
-
From the Control Panel, display Indexing Options.
-
Select the folder you are indexing, click Advanced, and then click the File Types tab.
-
Verify that the list of file types includes asm, psm, par, pwd, and dft, and if not included, add them to the list.
-
-
Click OK.
The system updates the specified FastSearchScope.txt file with the listed entries and submits those entries to the local Windows Indexer.
When the system finishes indexing all files, it displays the message Indexing complete, in the Indexing Options dialog box.
-
On the server, share the top-level folder you indexed so users have read and write access to it.
-
On the each client machine, create a mapped drive to the indexed folder and confirm that the map is set up correctly:
-
Start Design Manager and open a file from the mapped drive.
-
In the Design Manager document list, select a file.
-
Click Where Used
 .
.In the Used in list, the folder color should be green.
-
-
Verify that Windows Search Service (WSS) is started on your system and Log On As is set to Local System. We do not recommend to have the Startup Type set to Automatic (Delayed Start), because that can delay the indexing process.
For details on WSS, see Microsoft TechNet.
-
(Optional) Add more properties:
-
In Windows Explorer, browse to the indexed folders.
-
Set the view to detail and right-click a column header.
-
Click More.
-
Select any of the properties you want to see in the list.
-
After you install Fast Search, you are ready to configure it, as explained next.
© 2021 UDS