Activity: Create a contour flange
Create a contour flange
![]()
In the next few steps, you will use the Contour Flange command to construct a solid feature using the sketch you just drew.
In QY CAD, you can construct solid geometry using two basic approaches:
-
You can use a robust set of traditional modeling commands to construct specific types of features.
-
You can use the Select tool to construct certain features, such as flanges and tabs.
You will use both methods in this tutorial.
Launch the Activity: Create a contour flange.
Start the Contour Flange command
-
Choose the Home tab→Sheet Metal group→Contour Flange command
 .
.
Notice that a floating menu, called command bar, appears in the graphics window. You will learn more about command bar in the next few steps.
The Contour Flange command constructs a series of part faces connected by straight, parallel bends.
With this command, the system applies material thickness to the faces, offset in the direction you specify, and calculates bend characteristics between the faces.
Command bar overview
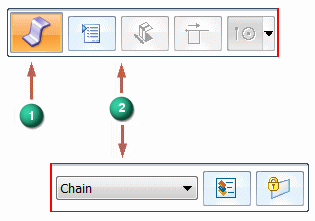
The command bar is displayed when you select certain types of elements. The command bar evaluates the selected elements and presents a targeted set of Actions and Options.
Actions:
The Actions list is displayed on the left side of the command bar (1).
For a contour flange, no other actions are available.
Options:
The options available for the current action are displayed on the remainder of the command bar (2).
For the first feature in a new part, you can use the Contour Flange command bar to specify the material thickness, bend characteristics such as bend relief, and so forth.
You will learn more about the command bar as you work through the tutorial.
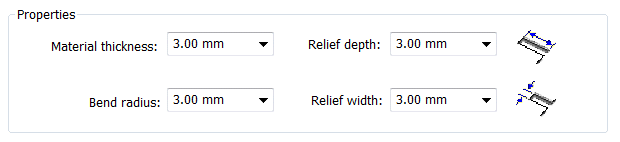
Set the material thickness and bend properties for the part
-
Click the Material Table button
 .
. -
On the Gage Properties tab, ensure the following options match the top illustration.
-
Material thickness: 3 millimeters
-
Bend radius: 3 millimeters
-
Relief depth: 3 millimeters
-
Relief width: 3 millimeters
-
-
On the Material Table dialog box, click Apply to Model.
Note:You can also set these options using the Material Table command, which is available on Application button→Info.
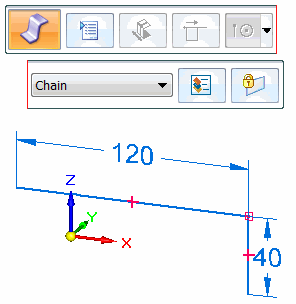
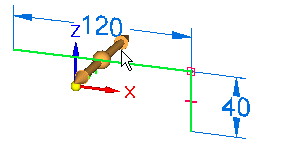
Select the sketch
-
Position the cursor over the sketch to highlight it, as shown, then click to select it.
Notice that a handle appears on the sketch. Use this handle to extrude the contour flange.
![]()
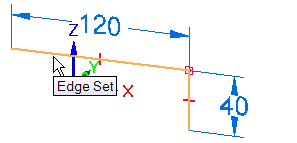
Select the flange handle and observe the on-screen tools
-
Position the cursor over the flange handle, as shown, and when it highlights, click to select it.
-
Move the cursor back and forth and notice that a solid feature is drawn dynamically as you move the cursor.

Notice the following, as shown below:
-
A dynamic input box (1) for the feature extent appears.
-
A material thickness direction arrow (2) appears on the sketch.
-
You use the dynamic input box to precisely define the extent of the feature.
You use the direction arrow to define the side to add material thickness. This option is available when constructing the first feature for a new part.
Define the material direction and feature extent
-
If the material thickness direction arrow is pointing up, click the arrow to change the direction.
-
Position the cursor behind the sketch as shown, and then in the dynamic input box, type 80, then press Enter.
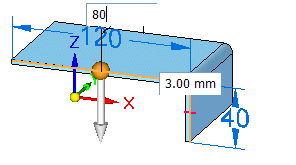
The finished feature displays.
For this feature, the material direction arrow should point below the sketch, and the material extent should be behind the sketch.
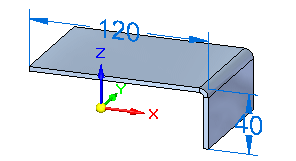
Observe the results
![]()
Your graphics window should resemble the illustration.
-
Notice that solid geometry is displayed and that the sketch is no longer displayed.
When you construct sketch-based features in QY CAD, the sketches are automatically hidden when you construct a feature, and any 2D dimensions you place on the sketch are automatically converted to 3D PMI dimensions and are attached to the appropriate model edges.
This process is called sketch consumption and dimension migration. Sketch consumption and dimension migration are discussed in detail in the help delivered with QY CAD.
After you construct a feature in a synchronous model, the original sketch geometry does not drive the feature.
Explore PathFinder
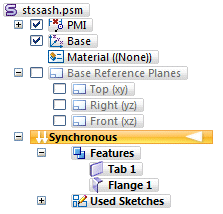
Take a few moments to explore PathFinder.
You use PathFinder to help you evaluate, select, and edit the components that comprise the models you create in QY CAD.
-
Click the
 symbols in PathFinder to expand the various headings until your display matches the illustration.
Notice the following in PathFinder:
-
A PMI heading that contains entries for the PMI dimensions.
-
A Base heading that contains an entry for the base coordinate system.
-
A Material heading that contains an entry for the material for the model.
-
A Base Reference Plane heading that contains an entry for the base reference planes.
-
A Features heading that contains Tab and Flange entries, which represent the contour flange you constructed.
-
A Used Sketches heading that contains a Sketch entry for the sketch you used to construct the feature.
When you construct sketch-based features, the sketches are added to the Used Sketches collection in PathFinder in case you want to use them for subsequent features later.
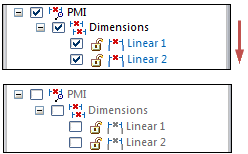
Hide the base coordinate system and PMI dimensions using PathFinder
-
In PathFinder, in the Base collector, position the cursor over the check box adjacent to the Base entry, as shown, and then click to clear the checkbox.
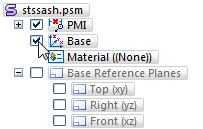
Notice that the Base entry in PathFinder changes color and that the Base coordinate system is hidden in the graphics window.
-
In PathFinder, clear the check boxes adjacent to the Dimensions entry to hide the dimensions in the graphics window.
Save the file
![]()
Your display should match the illustration.
-
On the Quick Access toolbar, click the Save button
 to save the work you have done so far.
© 2021 UDS