Activity: Draw the sketch of the first feature
Draw the sketch of the first feature
In this activity, you will draw and dimension a sketch of the first feature. The first sheet metal feature will be a contour flange.
Launch the Activity: Draw the sketch of the first feature.
Open the activity sheet metal file
-
Open ...\Program Files\UDS\QY CAD 2022\Training\stssash.psm.
-
Click the Application button
 to open the Application menu.
 -
On the Application menu, click Save As→Save As
 .
. -
On the Save As dialog box, in the File box, save the part to a new name or location so that other users can complete this tutorial using the original part.
-
In the Save As dialog box, click the Save button.
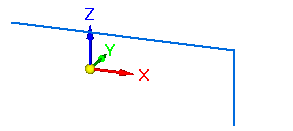
Observe the base coordinate system
![]()
The first step in drawing any new sheet metal part is drawing the sketch for the base feature.
You will first draw a sketch on one of the principal planes on the base coordinate system, and then extrude the sketch into a solid.
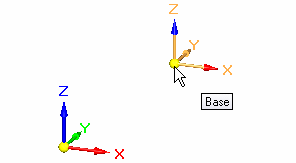
What is the base coordinate system for?
The base coordinate system is located at the origin of the model file, as shown above. It defines the principal X, Y, and Z planes, and can be used in drawing any sketch-based feature.
Depending on the configuration of your computer, there may also be a view orientation triad displayed in the graphics window. If so, the base coordinate system is the element shown highlighted in the illustration below. The view orientation triad, which cannot be selected, is for view orientation purposes only. For the remainder of this tutorial, the view orientation triad will not be shown.
Start the Line command
![]()
In the next few steps, you will draw and dimension the two lines shown in the illustration.
-
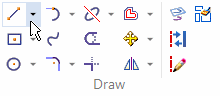
Choose the Home tab→Draw group→Line command
 .
.
Observe the alignment lines attached to the cursor
![]()
-
Move the cursor around the graphics window and notice that alignment lines extend outward from the cursor.
The alignment lines are oriented to the XZ principal plane of the base coordinate system. For this sketch, this is the correct orientation.
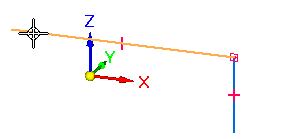
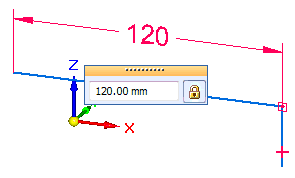
Draw a line
-
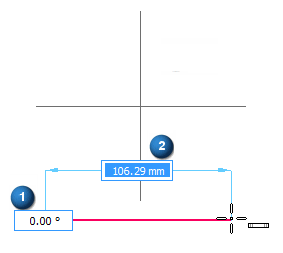
Position the cursor approximately as shown, and click.

-
Move your cursor to the right, and notice that on the left side of the screen the Length and Angle boxes update to reflect the current cursor position.

-
Type 120 as the length of the line, and then press Enter.
Note:When you type values, you must press Enter for the value to be recognized.
Notice that now, when you move the cursor, the line is always 120 mm, and only the angle changes.
-
Move the cursor to the right, and when the horizontal relationship indicator
 appears adjacent to the cursor, as shown, click.
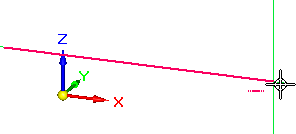 Note:
Note:For the remainder of this activity, the images will not show the edit handles (1) and (2) that are attached to the sketch elements.
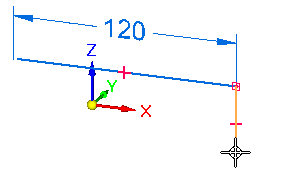
Draw another line
-
Move the cursor until:
-
The line Length is approximately 40 millimeters.
-
The line Angle is exactly - 90 degrees.
-
The vertical relationship indicator displays adjacent to the cursor, as shown above.

-
-
Click to place the new line.
-
After you have finished drawing the second line, right-click to restart the Line command.
The second line is placed, as shown below.
The Line command is still active, ready to draw a new line connected to the first line at its endpoint.
![]()
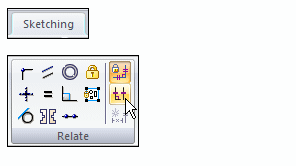
Display the relationship handles
-
Choose the Sketching tab→Relate group→Relationship Handles command
 .
.
This specifies that you want to display the 2D relationship handles for sketches.
![]()
Observe the sketch
![]()
| Notice that symbols representing geometric relationships are displayed on the sketch. |
Geometric relationships control how the sketch geometry reacts to modifications you make.
These relationships were automatically applied based on the cursor position and the current IntelliSketch settings.
| The symbols on the midpoint of the lines represent horizontal (A) and vertical relationships (B). | |
| The symbols on the endpoints of the lines represent end-point connect relationships (C). |
When you modify the sketch later, the lines that make up the sketch will remain endpoint-connected, horizontal and vertical.
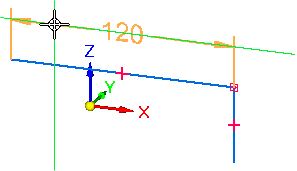
Dimension the sketch length
-
Choose the Home tab→Dimension group→Smart Dimension command
 .
. -
Position the cursor over the long horizontal line you drew earlier, as shown. When the line highlights, click to select it.
-
Move the cursor above the sketch, as shown, then click to define the dimension location.
Notice that a dimension value edit box appears in the graphics window.
-
Do one of the following:
-
If the dimension value is exactly 120 millimeters, click the lock to unlock the dimension.
-
If the dimension value is not exactly 120 millimeters, type 120, then click the lock to unlock the dimension.
Notice that the 2D sketch dimension you placed has changed color and the unlock option on the dimension value box is set.

-
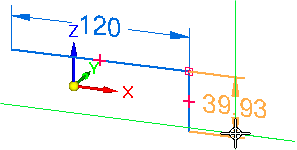
Dimension the sketch height
-
Position the cursor over the vertical line, as shown. When the line highlights, click to select it.
-
Move the cursor to the right, then click to position the dimension, as shown below.
-
In the dimension value edit box, type 40, click the lock option to unlock the dimension, then right-click.

-
On the Quick Access toolbar, choose the Save command
 .
.
The Smart Dimension command ![]() is still active.
is still active.
© 2021 UDS