Activity: Adding rounds and thin wall
Adding rounds and thin wall
In this activity you will round model edges, use QuickPick to select edges for rounding, construct a thin wall with multiple open faces.
Launch the Activity: Adding rounds and thin wall.
Round the edges
![]()
Use the Round command to round five edges of the part, as shown above.
-
On the Home tab→Solids group, choose the Round command
 .
. -
On the Round command bar, set the Select option to Edge/Corner. With this option, you can select edges and corners to be rounded.

-
On the Round command bar, in the Radius box, type 18, and then press the Enter key.
Select an edge to round
-
Move the cursor slowly over the model, and notice how the edges of the model highlight.

-
Position the cursor over the vertex shown and then pause. Notice that the cursor image changes to indicate that multiple selections are available.


-
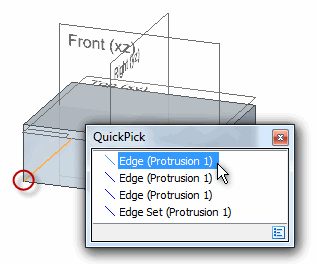
Right-click and the QuickPick tool appears. Move the cursor over the different entries in QuickPick, and notice that different edges of the model highlight. QuickPick allows you to select the edge you want, the first time, without having to reject unwanted edges.
-
Use QuickPick to highlight the edge shown, and then click the left mouse button to select it.
Select another edge to round
![]()
-
Position the cursor over the edge at the location shown.
Notice that the edge highlights, but QuickPick does not appear.
No other edges are near the cursor, so the system recognizes that QuickPick is not necessary for you to select the edge you want.
-
Click to select the edge.
Selecting the remaining edges to round
![]()
-
Select the additional edges shown in green. You round five edges.
Preview the round
![]()
On the Round command bar, notice that options are available in the Select Step for changing the radius of the round, deselecting the selected edges, and accepting the current input.
-
If you selected the wrong edges to round, click the Deselect button
 . This clears all the selected edges so that you can select new edges.Note:
If you select an edge that has already been selected, that edge is deselected.
-
If you selected the correct edges, click the Accept button
 .
. -
On the Round command bar, click the Preview button
 . The part should resemble the illustration.
Finish the round
![]()
The part should match the illustration.
-
When you are satisfied with your results, on the Round command bar, click the Finish button
 .
. -
Press the Escape key to end the Round command.
Save the part
![]()
-
On the Quick Access toolbar, choose the Save command
 to save the work you have done so far.
Construct a thin wall
![]()
The base feature and rounded edges define the general shape of the finished part.
The next step is to hollow out the interior, as shown. Use the Thin Wall command to accomplish this.
-
On the Home tab→Solids group, choose the Thinwall command
 .
. -
On the command bar, in the Common Thickness box, type 8, and press the Enter key.
Select the first face to leave open
![]()
When constructing thin wall features, you specify face(s) you want to leave open. For this feature, select the front and top faces of the part.
-
Position the cursor over the face shown. If the face shown highlights, click the left mouse button to select it.
If a different face highlights, use QuickPick to select the face shown.
Tip:If the element you want to select highlights, you can bypass QuickPick and select the element directly using the left mouse button.
Select the second face to leave open
![]()
-
Select the face shown in the illustration.
-
On the Thin Wall command bar, click the Accept button
 . This tells the system that you are finished selecting open faces.
Preview the thin wall feature
![]()
-
On the Thin Wall command bar, click the Preview button
 .
.
Finish the thin wall
![]()
Your part should look like the illustration. If it does not, you can use the Thin Wall command bar to edit any of the steps you took to create the thin wall.
-
If the thickness of your part looks different than the illustration, click the Common Thickness step on the command bar and make sure that the thickness is set to 8 mm.
-
If the open faces on your part look different than the illustration, click the Open Faces step on the command bar, click the Cancel button to clear the selected faces, and then select the faces again.
-
When you are satisfied with the appearance of your part, click Finish
 .
.
Save the part
![]()
-
On the Quick Access toolbar, choose the Save command
 to save the work you have done so far.
© 2021 UDS