Activity: Creating a base feature
Creating a base feature
In this activity you will create a base feature, learn about IntelliSketch, add dimensions to a sketch, learn about part symmetry using relationships, and edit a dimension.
Launch the Activity: Creating a base feature.
Open the activity part file
-
Open ...\Program Files\UDS\QY CAD 2022\Training\seppabj.par.
-
Click the Application button
 .
. -
On the Application menu, choose the Save As command.
-
On the Save As dialog box, save the part file to a new name or location so that other users can complete this activity.
Start the Extrude command
-
On the Home tab→Solids group, choose the Extrude command
 .
.
Notice the following:
The Extrude command bar appears.

PromptBar appears along the bottom of the application.

The Extrude command, like all the feature-creation commands in QY CAD, uses a command bar to guide you through the feature construction steps without limiting you to a strict linear workflow. You can move back and forth among the steps as you work.
PromptBar displays instructions for completing the current task. The reference plane option that is displayed in command bar may be different than the illustration. In the next step, you will set the proper option.
Select a profile plane
In the next step, select a reference plane on which you will draw the profile. For this feature, draw the profile on a reference plane that is coincident to one of the three base reference planes.
-
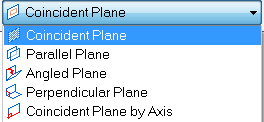
On the Extrude command bar, in the Create-From Options list, click the Coincident Plane option.
-
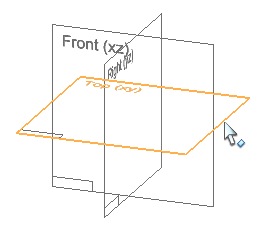
Move the cursor to the edge of the reference plane as shown. Click when the Top (xy) plane highlights.
What is the profile plane for?
You draw profiles on the profile plane. When you select a profile plane, QY CAD reorients the profile plane parallel to the screen so you can draw the profile easily. At the same time, the menus change. Buttons for constructing features are hidden, and buttons for drawing and modifying 2D wireframe elements appear instead.
When you finish drawing the profile in the true view, QY CAD reorients the profile plane back to where it was, with the profile on it, and changes the menus and toolbars back to the 3D commands.
Draw a rectangle
-
On the Home tab→Draw group, click the Rectangle list. Choose the Rectangle by 2 Points command
 .
. -
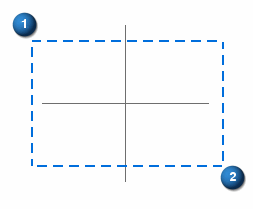
Position the cursor at point (1) and click.
-
Move the cursor down and to the right towards point (2) and notice that the Rectangle by 2 Points command bar updates to show the current Width and Height value.

-
Move the cursor down and to the right until the width value is approximately 130 mm, and the height value is approximately 90 mm. Click to define point (2).
The result of this step is a rectangle, consisting of two horizontal and two vertical lines, which are endpoint connected.
Observe the rectangle
![]()
| Notice that symbols representing geometric relationships appear on the rectangle. |
Geometric relationships control how the profile geometry reacts to modifications you make.
These relationships were automatically applied based on the cursor position and the current IntelliSketch settings. You will learn more about this in the next few steps.
| The symbols on the midpoint of the lines represent horizontal and vertical relationships. | |
| The symbols on the endpoints of the lines represent endpoint connect relationships. |
If the relationship handles do not display, on the Home tab→Relate group, choose the Relationships Handles ![]() command.
command.
When you modify the rectangle profile later, the lines will remain endpoint-connected, horizontal, and vertical.
Learn more about IntelliSketch
-
On the Home tab→IntelliSketch group, choose the IntelliSketch command
 .
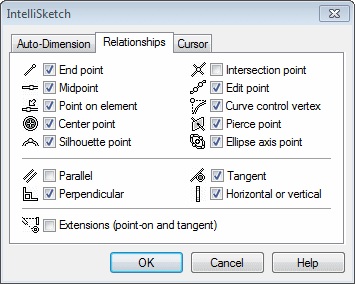
.The IntelliSketch dialog box is displayed.
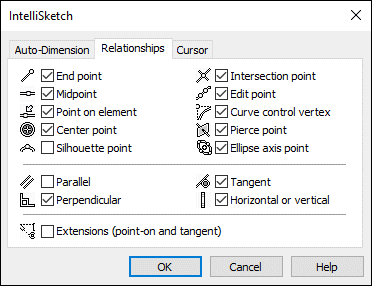
Make sure your settings match the illustration.
Take a few moments to review the options on the Relationships tab on IntelliSketch. The Relationships tab defines which relationships are recognized by IntelliSketch as you draw. Notice that the Endpoint and Horizontal or Vertical options are set. These options were used to automatically apply the relationships to the rectangle you just drew.
-
On the IntelliSketch dialog box, click OK.
Delete a line
![]()
To illustrate how you delete and add elements to a profile, you will now delete one of the lines, and then draw a replacement line. The Select tool lets you select elements so they can be edited, copied, or deleted.
-
On the Home tab→Select group, choose the Select command
 .
. -
Move the cursor over the lines in the profile. Notice that the lines highlight as the cursor passes over them.
-
Position the cursor over the line shown in the illustration, then click to select it.
Notice that:
-
The line color changes to the Select color.
-
The Line command bar appears, showing the length and angle of the line.
-
-
Press the Delete key. The line is deleted from the profile.
Note:The cursor must be positioned in the QY CAD window when you press the Delete key.
Note:Notice that the line, the horizontal relationship and the endpoint connect relationships were deleted.
Draw a new line
-
On the Home tab→Draw group, choose the Line command
 .
. -
Move the cursor to the endpoint of the line shown, and when the endpoint relationship indicator
 appears adjacent to the cursor, click.
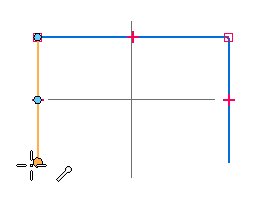
-
Move the cursor to the endpoint of the line shown, and when the endpoint relationship indicator
 appears adjacent to the cursor, click.
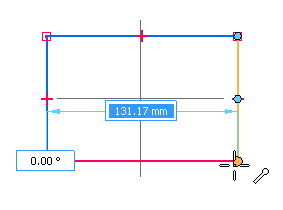
-
When you have finished drawing the line, right-click to restart the Line command.
Dimension the rectangle width
-
On the Home tab→Dimension group, choose the SmartDimension command
 .
. -
Position the cursor over the horizontal line on the rectangle. When the line highlights, click to select it.
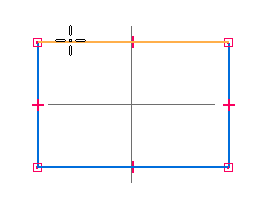
-
Move the cursor above the profile, and then click to define the dimension location.
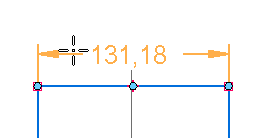
Notice that the exact dimension value is displayed on the Dimension command bar, in the Value group, and in the graphics window.

-
On the Dimension command bar, type 130, then press the Enter key.
Note:When typing values in a command bar box, you do not have to enter the unit type, such as mm or degrees.
Notice that the display value and the profile width update. The dimension you placed is a driving dimension. Driving dimensions control (or drive) the elements on which they are placed. Driving dimensions are red. Driven dimensions are blue.
Dimension the rectangle height
-
The SmartDimension command
 is still active.
 -
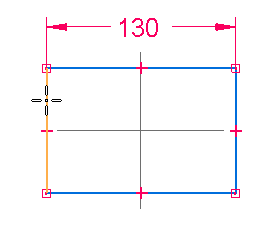
Position the cursor over the vertical line on the rectangle. When the line highlights, click to select it.
-
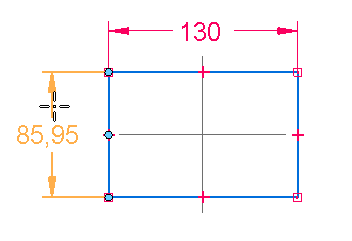
Move the cursor to the left, then click to position the dimension.
-
Type 90, then press the Enter key.
Taking advantage of part symmetry
![]()
The current dimensions and geometric relationships fully define the size and shape of the profile, but the profile is still free to move around on the profile plane.
Because the part you are constructing will have symmetric features, you can take advantage of the part symmetry if you ensure that the profile remains symmetrically aligned to the base reference planes (1) and (2).
You can use the base reference planes to take advantage of part symmetry and make your models easier to build and edit. This also helps build stability and predictability into your models.
In the next few steps, you will use horizontal and vertical relationships to symmetrically position the rectangular profile.
Using relationships to ensure symmetry
![]()
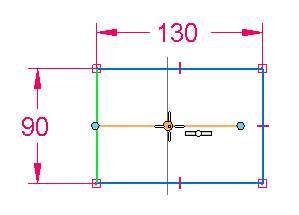
In addition to specifying that a line remains horizontal or vertical, you can also use a horizontal/vertical relationship to specify that one element remains horizontally or vertically aligned with respect to another element.
For this part, you will use a horizontal/vertical relationship to specify that the midpoint of the vertical line (1) stays horizontally aligned with one of the base reference planes.
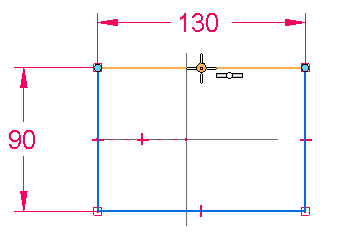
You will then use this technique again to specify that the midpoint of the horizontal line (2) stays vertically aligned with one of the base reference planes.
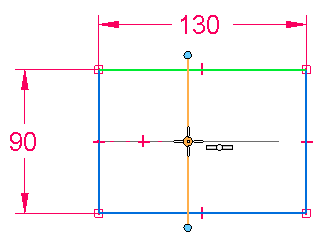
This ensures that the rectangular profile, regardless of its size, will stay symmetrically oriented to the base reference planes.
This technique is a powerful tool that can be used in many situations.
You can use a horizontal/vertical relationship to specify that two elements remain horizontally or vertically aligned with respect to each other.
Apply a horizontal relationship
-
On the Home tab→Relate group, choose the Horizontal/Vertical command
 .
. -
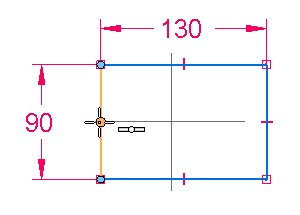
Position the cursor as shown, and when the midpoint relationship indicator
 appears adjacent to the cursor, click.
-
Position the cursor where the reference planes intersect, as shown, and when the midpoint relationship indicator appears, click.
It does not matter which reference plane highlights. The profile position updates.
Apply a vertical relationship
The Horizontal/Vertical command should still be active.
-
Position the cursor as shown, and when the midpoint relationship indicator appears, click.
-
Position the cursor where the reference planes intersect, and when the midpoint relationship indicator appears, click. The profile position updates.
Edit the dimensions
![]()
The size, shape and position of the rectangular profile is fully constrained.
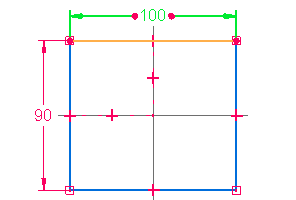
For this profile, if you edit either of the dimensions, it will remain symmetrically aligned about the reference planes.
-
On the Home tab→Select group, choose the Select command
 .
. -
Select the 130 mm dimension. Notice that the Dimension ribbon bar appears.
-
On the Dimension command bar, type 100, then press the Enter key.
-
Change the dimension back to 130. On the Dimension command bar, type 130, then press the Enter key.
If you would like to experiment with other values, feel free to do so.
Finish the profile and close the profile view
![]()
The Select tool command should still be active.
-
If required, edit the dimensions so that they match the illustration.
-
On the Home tab→Close group, choose the Close Sketch command
 .
.
You can also close the sketch using the Close Sketch icon in the top-left corner of the graphics window.
![]()
The Close Sketch command closes the profile view and returns to the 3D part view. The Extrude command bar shows that the next step is the Extent Step (1): projecting the 2D profile to form a 3D solid.
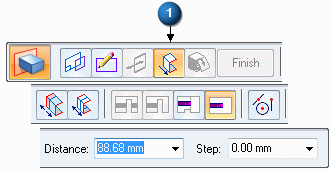
Prepare to construct the base feature
![]()
The first step in drawing any new part is constructing a base feature. The base feature defines the basic part shape that you modify to construct the finished part. Use the Extrude command to extrude a 2D profile along a straight line, creating an extruded feature.
Define the feature extent
![]()
-
Position the cursor below the profile you just drew, and notice that the feature is drawn dynamically as you move the cursor.
Also notice that the Distance box on the Extrude command bar dynamically updates to show the extent of the feature.
-
On the Extrude command bar, type 40 in the Distance box for the extent of the base feature, then press the Enter key.

-
Position the cursor below the profile, and click to finish defining the extent.
-
On the Extrude command bar, click the Finish button
 to complete the protrusion feature.
 -
Press the Escape key to end the Extrude command.
Notice that when you clicked the Finish button, the profile elements, including the dimensions and relationships, are automatically hidden for you.
You have completed the base feature.
Fit the view
![]()
Commands for adjusting the contents of the graphics window are located at the bottom-right side of the QY CAD application window.
![]()
-
Choose the Fit command
 to fit the contents of the view to the graphics window.
Notice the Protrusion 1 entry in PathFinder

Notice that a Protrusion 1 entry is added to the PathFinder tree. You can use PathFinder to help you evaluate and edit the models you create in QY CAD.
Later you will use PathFinder to select and edit a feature.
Save the part
![]()
-
On the Quick Access toolbar, located at the top-left side of the application window, choose the Save command
 to save the work you have done so far.
© 2021 UDS