Activity: Replace a subassemby
Replace a subassembly
In this activity you will learn how to replace a subassembly to define a new member.
Launch the Activity: Replace a subassemby.
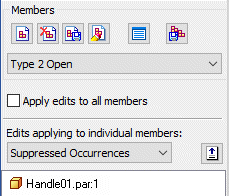
Observe the Type 2 Open family member
-
Display the Family of Assemblies tab
 .
. -
In the Suppressed Occurrences list for the Type 2 Open family member, notice that Handle01.par has been added to the list.
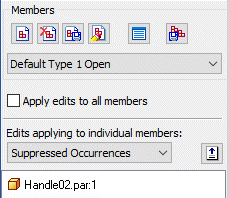
Activate the Default Type 1 Open family member
-
On the Family of Assemblies tab, activate the member named Default Type 1 Open.
Notice that for this family member, that Handle02.par is in the Suppressed Occurrences list.
Also notice that the assembly display updated when you activated this family member.
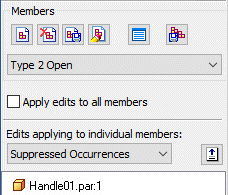
Activate the Type 2 Open family member
-
On the Family of Assemblies tab, activate the member named Type 2 Open.
In the next few steps you will finish defining the characteristics for this member by replacing a subassembly.
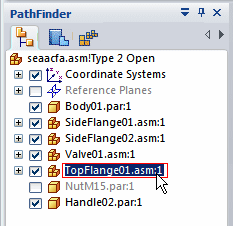
Select the subassembly to replace
-
In PathFinder, select the entry named TopFlange01.asm.
-
Choose the Home tab→Modify group→Replace Part command
 .
. -
Right-click or press Enter to accept the part you selected.
You can use the Replace Part command to replace a part or subassembly within the assembly. When replacing a subassembly, you must select it within PathFinder.
Select the replacement assembly
![]()
-
On the Replacement Part dialog box, do the following:
-
Set the location to the QY CAD Training folder.
-
Set the Files Of Type option to Assembly Files (*.asm).
-
Select the assembly file named TopFlange02.asm.
-
Click Open.
-
Observe the replacement subassembly
![]()
In the assembly window, notice that the replacement subassembly does not have four socket head screws.
In place of one of the screws is a stud that serves to limit the rotation of the new handle.
Display the Occurrence Overrides list
-
Display the Family of Assemblies tab
 .
. -
On the Family of Assemblies tab, set the Occurrence Overrides option.
Notice that for this member that TopFlange01.asm was overridden by TopFlange02.asm.
When you replace a part or subassembly, the original occurrence is added to the left column in the list and the replacement occurrence is added to the right column in the list.

Create another family member
-
On the Family of Assemblies tab, click the New button
 .
. -
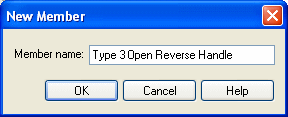
On the New Member dialog box, type: Type 3 Open Reverse Handle, then click OK.
![]()
In the next few steps, you will create another family member. For this family member, you will change the position of Handle02.par, as shown in the illustration. This family member will illustrate how you can suppress relationships for a part. Suppressing relationships for a part allows you to add new relationships that change the position of the part.
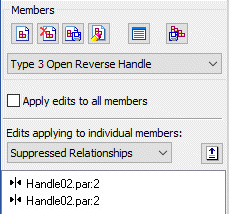
Set the Suppressed Relationships option
Notice that the new member you created is active and that it has the characteristics of the Type 2 Open member.
-
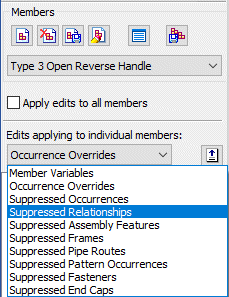
On the Family of Assemblies tab, do the following, as shown in the illustration:
-
Set the Suppressed Relationships option.
-
Ensure that the Apply Edits To All Members option is cleared.
-
When you suppress relationships, you can suppress them for all family members, or for only the active member. In this case, you want to suppress the relationships for only the active member.
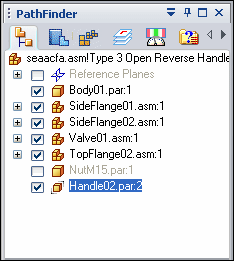
Display the PathFinder tab
-
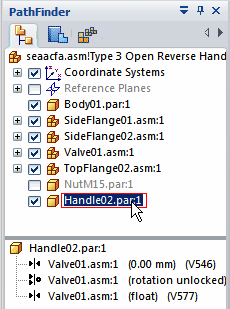
In the top pane of PathFinder, select Handle02.par, as shown.
Delete the mate relationships
-
In the bottom pane of PathFinder, do the following, as shown:
-
Select the first mate relationship.
-
Hold the Ctrl key on the keyboard.
-
Select the second mate relationship.
-
Press the Delete key on the keyboard.
-
Notice that the symbol adjacent to Handle02.par changes to indicate that it is no longer fully positioned.
Observe the suppressed relationships
-
Display the Family of Assemblies tab
.Notice that the relationships you suppressed were added to the Suppressed Relationships list for the family member named Type 3 Open Reverse Handle.
Resize the window area in the assembly window
-
On the Viewing commands toolbar, choose the Zoom Area command
 .
. -
Zoom in on the area shown in the illustration.
-
After you have resized the view area, click the right mouse button to exit the Zoom Area command.
![]()
Reposition the handle
-
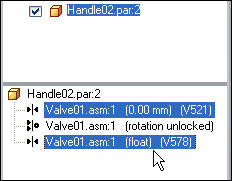
In the top pane of PathFinder, select Handle02.par, as shown.
-
Click the Edit Definition button
 .
.
Mate the handle to the shaft
-
On the Assemble command bar, in the Relationship Types list, select the Mate option.
-
In the assembly window, use QuickPick to select the top face of the handle as shown.
![]()
Select the mating face on the shaft
![]()
-
Use QuickPick to select the planar face on the shaft as shown in the illustration.
Observe the result
![]()
The handle is mated to the shaft as shown in the illustration.
Mate the handle to the shaft again
-
On the Mate command bar, click the Floating Offset button
 .
.The Floating Offset setting allows the faces you will mate to take on whatever offset value is appropriate to satisfy the other relationships that position the two parts.
-
In the assembly window, use QuickPick to select the face of the handle shown in the illustration.
![]()
The Mate option should be still be active.
Select the mating face on the shaft
![]()
-
Use QuickPick to select the planar face on the shaft as shown in the illustration.
Observe the result
![]()
The handle is fully positioned in the assembly.
Fit and save the assembly
-
On the Viewing Commands toolbar, choose the Fit command
 to fit the assembly in the window.
 -
Save the assembly.

-
If any parts are still selected, click in empty space to deselect them.
![]()
© 2021 UDS