Activity: Create a weld label feature
Create a weld label feature
In this activity you will learn how to create a definition of a weld by placing a label only.
Launch the Activity: Create a weld label feature.
Display the PinHolder1 part and fit the view
-
Choose the Home→Select→Select command
 .
. -
In the PathFinder tab, position the cursor over the check box adjacent to the PinHolder1.par entry, then click to display the PinHolder1.par part.

-
On the Viewing commands toolbar, click Fit
 .
.
Zoom in closer
-
On the Viewing commands toolbar, click Zoom Area
 .
. -
Click above and to the left, as shown, and then again below and to the right.

-
Right-click to end the Zoom Area command.
Prepare to label edges to be welded
![]()
You can also define weld operations without creating a weld bead solid body using the Label Weld command.
You define the weld symbol properties, then select the edges to be welded.
Later, in the Draft environment, you can use the Weld Symbol command to extract the weld symbol information from the assembly and place the symbol onto the drawing.
The edges you mark using the Label Weld command are displayed in a different color in the assembly. They also highlight in the drawing when you select the Weld Symbol command.
In the next few steps, you are going to define weld symbol parameters and select the edges to be welded shown in the illustration.
Define the weld label properties
-
Choose the Features→Assembly Weld Features→Label Weld command
 .
. -
If the Label Weld Options dialog box does not automatically display, on the Label Weld command bar, choose Options
 .
. -
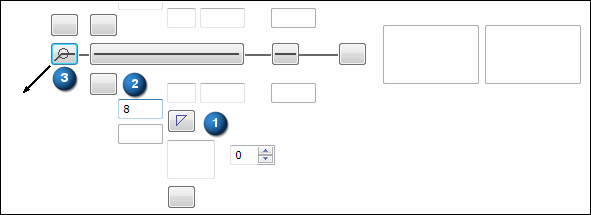
On the Label Weld Options dialog box, set the following options, as shown in the illustration:
-
Select the Fillet Weld symbol (1) from the list of symbols for the arrow side of the weld symbol.
-
In the Fillet Weld Size box (2), on the left side of the Fillet Weld symbol, type 8, for the size of the weld.
-
Set the All Around symbol option (3)
 .
.
-
-
Click OK.
Select edges for the weld label
-
Select the four edges shown.

-
On the command bar, click Accept
 .
.
Finish the command
-
On the command bar, click Finish.
Notice that the edges you selected have changed color to indicate that a weld label has been applied to the edges.

© 2021 UDS