Format property text values
You can specify how an associative value is displayed when a property text string or reference text value is resolved in a document. For example, you can specify that dual units or no units are displayed in the result, or the type of tolerance to show.
-
Open the Properties dialog box or the Modify Style dialog box for an object that contains property text.
Example:For this object
Use this dialog box
To format property text values for
Text box
Insert Property Text
Any property text or reference text in the text box
Dimension
Dimension Prefix
Dimension Style
Dimension Properties
Prefix, Suffix, Superfix, Subfix, Subfix 2
Feature Callout, Smart Depth
Callouts
Callout Properties, on the General tab, Smart Depth tab, and Feature Callout tab
Feature Callout, Smart Depth, general Callout text, and Callout 2 text
Balloons
Balloon Properties, on the General tab
Upper, Lower, Prefix, Suffix
Drawing view captions
Drawing View Properties or Drawing View Style, on the Caption tab
Primary caption text, Secondary caption text
View annotation captions
Cutting Plane Properties, Viewing Plane Properties, and Detail Envelope Properties, on the Caption tab
View annotation label name
Primary caption text
Technical requirements text
Technical Requirements Properties, on the General tab and the Title tab
Title
Enumerated items
Table titles
Any Table Properties dialog box, on the Title tab
Table title
Column data in associative tables
Parts List Properties or Table Properties, on the Columns tab
Real numbers, date and time, text case
Block labels
Block Label Properties
Name, Value, Description
Note:For annotations that are not listed in the table above (such as feature control frames, datum frames, datum targets, weld symbols, and surface texture symbols) you can apply formatting to the property text values by typing the format codes using the proper syntax. See the following help topics for more information:
-
In the Properties dialog box:
-
Position your cursor within or immediately preceding an underlined property text string.
Example:Underlined property text indicates a string whose value is eligible for formatting.
Pink property text indicates a symbol code. Symbol codes are not eligible for formatting.
-
When the underlined property text string turns red, click the Format button.
Example:Red property text indicates the string is selected.
Note:Dimension property text and dimension prefix property text is not underlined, and it does not change color.
-
-
In the Format Values dialog box:
-
Select the check box preceding the type of formatting you want to apply.
-
If there is a list, select the specific format you want to use.
-
-
Click OK to close the dialog box and see the evaluated result.
The formatting options that are available depend on the property text string you are modifying. Refer to the following examples.
Example:Specify units
-
You can choose not to display default units for physical properties or other values. To omit units, in the Units section, click No units (/NU).
-
You can specify that evaluated property text values are displayed in dual units. This requires that the dual units options are predefined on the Secondary Units tab in the Dimension Style dialog box. Then in the Format Values dialog box, in the Units section, click Dual units (/du).
Example:Set precision for numeric properties
-
You can control the number of decimal places in numbers. To display four decimal places, in the Text section, select the Round-off (/@n) check box, and from the list select .1234.
Example:Specify date and time properties
-
When you modify a property text string that returns a date, such as %{Created} or %{Modified}, you can customize the date and time display by selecting a format option in the Text section, from the Date-time (/@) list.
Example:If the Input value is %{Created}, you can display the exact date and time a file was created, such as 1/1/2015 1:01:01 AM:
-
From the Date-time (/@) list, select the option, M/d/yyyy h:mm:ss tt.
The Output value box now displays the formatted property text string,
%{Created/@M/d/yyyy h:mm:ss tt}.
-
Select the Date-time (/@) check box.
-
Example:Apply stack or limit tolerance
-
You can specify stack tolerance or calculate limit tolerance by doing the following:
-
Click Tolerance.
-
Select the tolerance type (Stack (/ST) or Limit (/LT).
-
In the Upper box, type the value for the upper stack tolerance or the upper limit value.
-
In the Lower box, type the value for the lower stack tolerance or the lower limit value.
Example:You can specify limit tolerance and apply four decimals of precision to the calculated limit result, where Nominal HS=12.123245
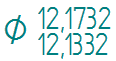
-
-
© 2021 UDS