Activity: Additional move techniques
Additional move techniques
In this activity we will modify the model using three different techniques. These techniques will help you to understand the Design Intent panel, Advanced Design Intent panel, and Solution Manager.
Launch the Activity: Additional move techniques.
Prepare to modify the model
![]()
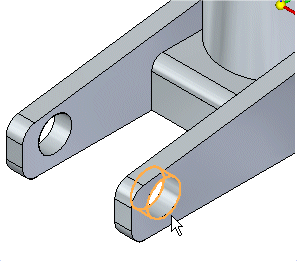
In the next few steps, modify the model to shorten the right mounting arm, as shown.
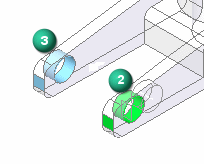
Select the first face to move
-
Position the cursor over the cylindrical face shown, and when it highlights, click to select it.
Select the second face to move
-
Hold the Ctrl key down, position the cursor over the face shown, and when it highlights, click to select it.
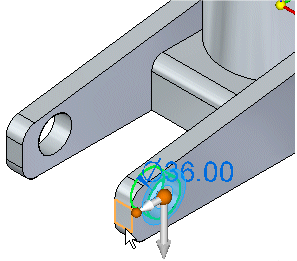
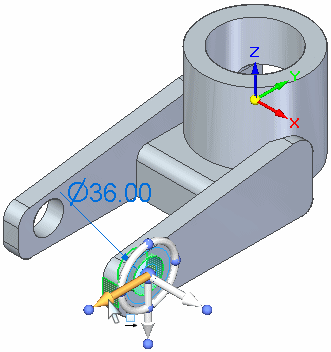
Select the primary axis on the steering wheel
-
Position the cursor over the primary axis on the steering wheel. When it highlights, click to select it.
Observe the Advanced Design Intent panel and the model
![]()
![]()
-
Move the cursor slowly to the left and right.
Observe the following:
-
The position of both cylindrical cutouts and the length of both mounting arms change as you move the cursor.
-
The preserved Design Intent relationships detect the Symmetric About Base: (Y)Z relationship.
Note:The Symmetric About Base relationship overrides other detected relationships for the select set. If you turn off that relationship, then you see Coplanar and Concentric relationships detected.
As learned earlier, option buttons in the Advanced Design Intent panel appear green when deselected geometry matches a Design Intent relationship that is being preserved.
For this modification, you only want to change the position of the selected elements on the right mounting arm.
You could easily do that by clearing the Symmetric About Base: (Y)Z, coplanar, and concentric settings in the Design Intent panel settings.
For this modification, you will learn three methods to achieve the desired synchronous modification.
Method 1: Manual Design Intent control
-
Notice that the Symmetric About Base: (Y)Z relationship is detected as shown in the Advanced Design Intent panel. As you move the select set, the opposite circular cutout and face participate in the move to maintain symmetry. Turn off the Maintain Symmetry About Base Planes option.
-
Now the coplanar and concentric relationships are detected. As you move the select set, the opposite circular cutout and face participate in the move to maintain these relationships. Turn off the Coplanar and Concentric options.

-
As you move the select set, the opposite circular cutout and face do not participate which is the desired modification. Do not click. Press Escape to end the move.
 Note:
Note:The Design Intent settings remain active throughout the modeling session. You can click the Restore button
 in the Advanced Design Intent panel to return to the default settings. The settings on the Design Intent panel are only preserved for the current session.
You can change the Design Intent settings to ignore relationships found during a synchronous modification. Do this by turning off the detected relationships in the Design Intent panel or the Advanced Design Intent panel.
Method 2: Suspend Design Intent relationships
-
On the Design Intent panel, uncheck the Design Intent option (1).
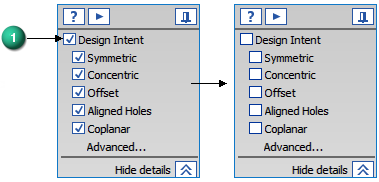
Or on the Advanced Design Intent panel, click the suspend button
 . When suspended, the button turns red.
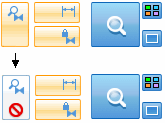
-
As you move the select set, the opposite circular cutout and face do not participate which is the desired modification. Do not click. Press Escape to end the move.
Note:You click the Suspend button again to the re-apply the Design Intent settings.
You can suspend all Design Intent settings to ignore all relationships found during a synchronous modification.
Method 3: Solution Manager
-
Restore the Design Intent settings by clicking the Restore button on the Advanced Design Intent panel.
. -
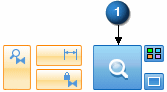
As you move the select set, press Ctrl + E to start the Solution Manager (or press the Solution Manager (1) button).
-
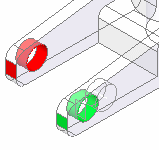
While in the Solution Manager mode, the move pauses. The model faces involved in the solve change color to provide graphical feedback of the solution state. The green faces (2) are the select set faces. The blue faces (3) are the faces detected by Design Intent settings.
-
Select the two blue faces. They change to a red color and are removed from the solve.
-
Click the Solution Manager check button to proceed with the modification.

You can manage how a synchronous modification solves by using the Solution Manager. The solution manager is a graphical interface that allows you to visually observe the active solve state. You can then manage the solution by interacting with the faces.
Finish modifying the model
-
In the graphics window, position the cursor to the right, and when the delta move value indicates the mounting arm is approximately 30 mm shorter, type 30 in the dynamic input box, then press Enter.
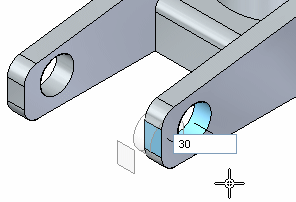
The right mounting arm is shortened by 30 millimeters. Notice that the left mounting arm does not change.
![]()
Clear the select set and fit the view
![]()
-
Move the cursor away from the model geometry, then double-click the left mouse button quickly to clear the select set.
-
Choose the Fit command
 to fit the view.
Save the part
![]()
-
On the Quick Access toolbar, choose the Save command
 to save the completed part.
© 2021 UDS