Activity: Working with relationships
Working with relationships
In this activity we will explore face relationships. We will observe the user interface and apply relationships to faces to define model intent.
Launch the Activity: Working with relationships.
Open a file and save a copy
![]()
-
On the Application menu, choose the Open command.
-
Navigate to the training folder where QY CAD is installed and open stppbac.par.
-
On the Application menu, choose the Save As→Save As command.
-
On the Save As dialog box, save the part to a new name or location so that other users can complete this activity.
Evaluate the part
![]()
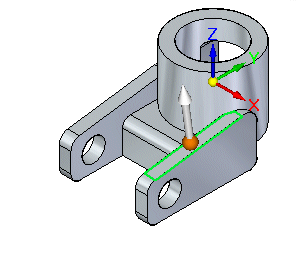
Take a few moments to evaluate the part.
-
Notice that the green cylindrical faces (1) are not concentric.
-
Notice that the cyan planar faces (2) are not coplanar.
This activity demonstrates how you can edit the position of existing faces using the face relationship commands. In the next few steps, make the two cylindrical faces concentric and the two planar faces coplanar
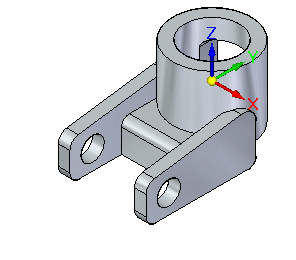
Doing this makes the two mounting arms on the part symmetric with one another, as shown.
![]()
Start the Select command
![]()
Use the Select tool to select elements to edit, copy, and delete.
-
Choose Home tab→Select group→Select
 .Note:
You can also press Escape at any time to start the Select command.
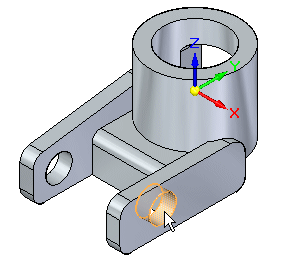
Select the face to move
-
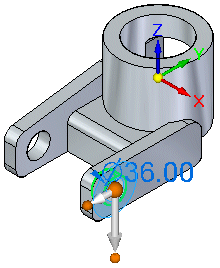
Position the cursor over the cylindrical face shown. When it highlights, click to select it.
Notice that the Move command bar (1) and the steering wheel (2) appear. The command bar is shown in the horizontal orientation here, though you may see it in the window vertically along one side or the other, depending on the user interface theme you chose.
![]()
When selecting a cylindrical face, a 2D steering wheel appears. Click the origin knob to change to a 3D steering wheel.
Command bar overview
![]()
The Move command bar presents a targeted set of options.
When moving a face, you specify how the adjacent faces on the model react to the move, whether the original face is moved, or copied, and whether the face detaches from the model during the move operation.
You want to move the face such that it is concentric with another face on the model. To do this, you choose the Concentric command on the Home tab→Face Relate group.
Start the Concentric command
-
Choose the Home tab→Face Relate group→Concentric command
 .
.
You can use the face relationship commands to modify the position and orientation of one or more selected faces such that they are geometrically related to a target face on the part.
Observe the Concentric command bar
![]()
Take a few moments to observe the options on the Concentric command bar:
| The Connected Faces option controls how adjacent faces change when you apply the relationship. | |
| The Single/All option controls whether only the first face you select or all the select faces change when you apply the relationship. | |
| The Persist option controls whether to create a persistent relationship. When this option is set, a relationship adds to the Relationship collector in PathFinder. If you modify the faces later, the relationship is honored. | |
| The Precedence option lets you either set the select set to override the model geometry or set the model geometry to override the select set. |
Select the target face
When you apply a relationship, you first select a target face on the model. In this case, you want the face you selected earlier to be modified such that it is concentric with the cylindrical face shown highlighted.
![]()
-
Position the cursor over the cylindrical face shown, then click to select it.
The face you selected earlier moves such that it is concentric to the target face.
![]()
Accept the target face
-
On the Concentric command bar, turn off the Persist option.
-
On the Concentric command bar, click Accept
 .
.Notice that the cylindrical face is concentric with the target face, and the steering wheel appears.
-
Click in empty space to clear the current selection.
At this point, you can either accept or cancel the change to the model.
Select the planar face to modify
-
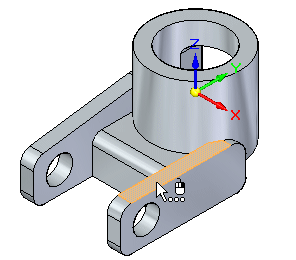
Position the cursor over the planar face shown, then click to select it. This is the seed face. The seed face changes.
Start the Coplanar command
-
On the Home tab→Face Relate group, choose the Coplanar command
 .
.Notice on the command bar that the Persist option
 is set.
Select the target face
-
Position the cursor over the face shown. This is the target face. The seed face aligns to the target face. Click to select the face.
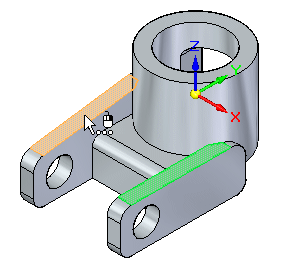
The seed face changes to align coplanar to the target face, as shown.

Accept the target face
-
On the Coplanar command bar, click Accept
 .
.Notice that the seed face is coplanar to the target face, and the steering wheel appears, as shown.
-
Click in empty space to clear the current selection.
The right arm is now symmetric with the left arm.
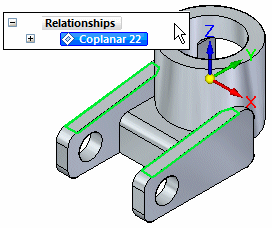
Show the coplanar relationship in PathFinder
Because the Persist option is on for the coplanar relationship, the relationship is available in the PathFinder tab.
-
Click the
 symbol in PathFinder to expand the Relationships collector.
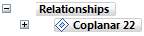
Notice that a coplanar relationship is in the Relationships collector in Pathfinder.
The number adjacent to the coplanar relationship on your computer may be different than the illustration.
Select the coplanar relationship in PathFinder
-
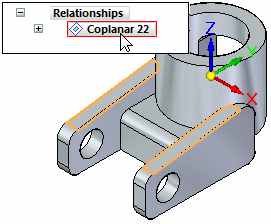
In PathFinder, position the cursor over the coplanar relationship, but do not click.
Notice that the model faces that define the coplanar relationship highlight in the graphics window.
-
In PathFinder, click to select the coplanar relationship, then move the cursor away.
Notice that the faces used to define the relationship are selected in the graphics window.
Use PathFinder to review, select, and delete relationships between model faces. This can be useful when editing a model later.
Save the part
![]()
-
Click in empty space to deselect the relationship.
-
On the Quick Access toolbar, located at the top-left side of the application window, choose the Save command
 .
.
© 2021 UDS