Activity: Construct another contour flange
Construct another contour flange
This activity:
-
Defines an edge for the contour flange
-
Draws and dimensions a profile for the contour flange
-
Defines the extent for the contour flange
-
Specifies the contour flange options
Launch the Activity: Construct another contour flange.
Construct another contour flange
![]()
You will construct another contour flange along the edge at the back of the part. The flange will be mitered at the two bends in this edge.
-
Choose the Home tab→Sheet Metal group→Contour Flange list→Contour Flange command
 .
.
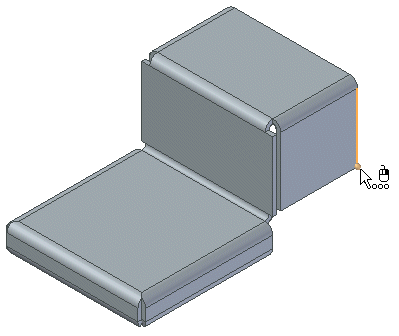
Select an edge
-
In the Create From Options list, set the Plane at End option.

-
Position the cursor over the bottom edge at the back of the part, as shown.
-
Position the cursor so that the start-point of the edge, shown as a bold point on the highlighted edge, is displayed at the right side of the part. When the edge highlights, click to select it.
Select the base of the profile plane
-
To orient the x-axis of the profile plane, select the face shown.
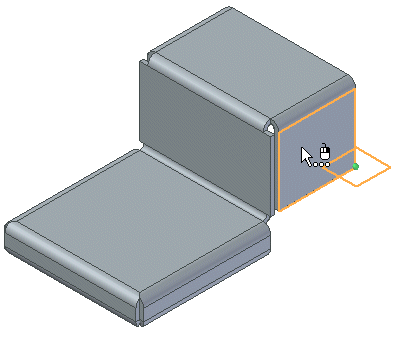
Specify the origin of the x-axis
-
To define the origin of the left axis, position the cursor near the left side of the profile plane, as shown, and click.

Draw the profile of the contour flange
-
Draw the profile shown. Notice that the line is endpoint-connected to the top-right edge of the part.
If you are comfortable drawing it on your own, you can skip the step-by-step instructions for drawing the profile.
Draw a line
-
Choose the Home tab→Draw group→Line command
 .
. -
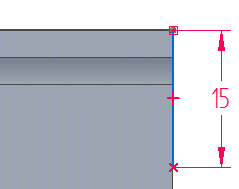
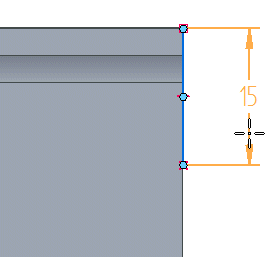
Position the cursor at the right endpoint of the horizontal edge at the top of the part, as shown.
-
When the edge highlights and the endpoint relationship indicator is displayed, click.
-
Type 15 mm as the length of the line, and position the cursor so the line extends vertically downward, as shown in the top illustration. Notice that the vertical line that represents the right edge of the part highlights, and the point-on-element relationship indicator is displayed. Because this line is vertical, placing the line with the point-on-element relationship will yield correct results.
![]()
Dimension the profile
-
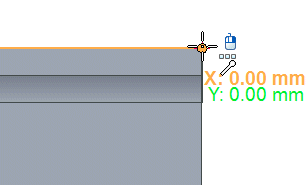
Choose the Home tab→Dimension group→Smart Dimension command
 .
.Select the line, and position the dimension as shown.
Finish the profile
-
Ensure that your profile matches the illustration.
-
Select the line, and position the dimension as shown.
The vertical line must be endpoint-connected to the horizontal edge from which the flange was defined.
-
Use the Select Tool to select and edit the dimension if it does not match the illustration.
-
Choose the Home tab→Close group→Close Sketch command
 .Tip:
.Tip:You can also close the sketch using the Close Sketch icon in the top-left corner of the graphics window
 .
.
![]()
Define the extent of the contour flange
-
Click the Chain extent option
 .
. -
Set the Select filter to Chain.
-
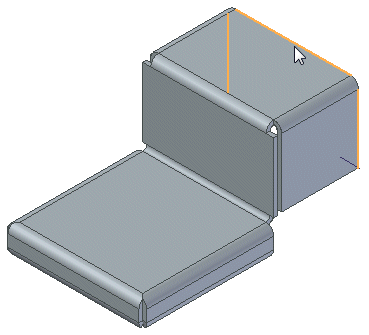
Select the chain of edges shown.
-
Click the Accept button
 .
.
Rotate the view
-
On the Status bar at bottom-right of the application window, click the Rotate button
 .
. -
Position the cursor over the vertical view axis, and when it highlights, click to select it.
![]()
Notice the torn corners where the contour flange wraps around the bends in the part.
You will rotate the view about the vertical view axis to get a better look at the corners.
Type the rotation angle
-
In the Rotation Angle field, type -100 and press Enter.
-
Click the Close button to end the Rotate View command and return to the Contour Flange command.
![]()
Set the close corner option
-
On the Contour Flange command bar, click the Options button.
-
On the Contour Flange Options dialog box, on the Miters and Corners tab, set the Close Corners option, and ensure the Treatment is set to Open.
-
Click OK to apply the options.
![]()
Notice that the corners have been relieved, but they are still poorly mitered.
Finish the contour flange
![]()
The corners are now mitered well, and a square cutout has been applied to relieve the miter.
If you like, display the Contour Flange options again and try setting the interior corner treatment to Circle Cutout or to Close. These settings are available to let you choose the options that are most effective for your applications.
-
Click the Finish button.
Save the file
![]()
On the keyboard, press Ctrl+I to return to the isometric view of the part.
-
On the Quick Access toolbar, click the Save button to save the work you have done so far
 .
.
© 2021 UDS