Edit a constraint
You can delete constraints, rename, and create constraints from the Simulation pane. You can edit constraints by selecting them in the graphics window.
Edit a constraint
-
In the graphics window, click a constraint symbol.
Tip:-
If the constraint symbols are not visible or if there are multiple constraints, you can first expand the Constraints group in the Simulation pane, and then select the constraint by name. This highlights the symbols associated with that constraint in the graphics window.
-
You also can use QuickPick to select a constraint symbol.
-
-
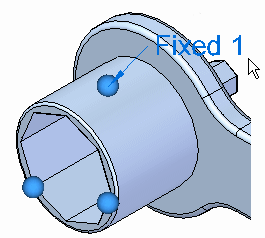
Click the constraint edit definition handle in the graphics window.
Example:The edit definition handle looks like a 3D annotation, for example, Fixed 1.

-
Make changes on the Constraints command bar, and then right-click to apply the changes.
Copy constraints
You can copy constraints from one study to another, as long as the study is of the same type.
-
Activate a study to copy from.
-
In the Simulation pane, do one of the following:
-
To copy one constraint, right-click the constraint name, for example, Fixed 1, and choose Copy.

-
To copy all constraints in the study, right-click the Constraints node and choose Copy.

-
-
Activate another study to copy to.
-
Right-click the Constraints node and choose Paste.
Delete constraints
-
Ensure the study you want to modify is the active study.
To learn how, see Activate a study.
-
In the Simulation pane, do one of the following:
-
To delete one constraint, right-click the constraint name and choose Delete.

-
To delete all constraints in the study, right-click the Constraints node and choose Delete All.

-
© 2021 UDS