Activity: Editing a swept feature
Editing a swept feature
In this activity, learn how to edit a swept feature, edit cross sections of a swept feature, add a cross section to a swept feature, and change the cross section alignment of a swept feature.
Launch the Activity: Editing a swept feature.
Edit the Cross Section step
-
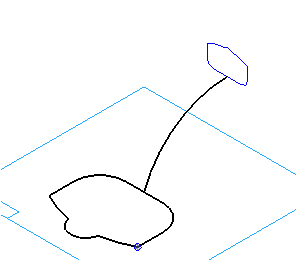
Select the Protrusion feature in PathFinder and then click the Edit Definition button.
-
On the command bar, click the Cross Section Step button
 .
.The system rolls the model back to show the cross section. The path and cross section are displayed, and the command bar displays options to edit the cross section.
Add another cross section
-
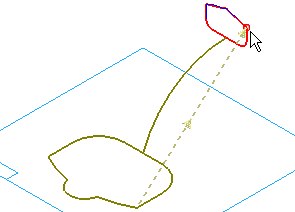
On the command bar, click the Plane or Sketch step button
 .
. -
Select the Select From Sketch/Part Edges option.
-
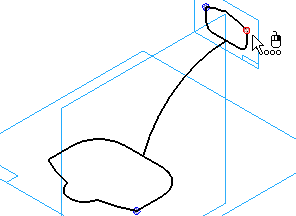
Position the cursor over the vertex shown, and notice that a dashed line is displayed that connects the start point on the first cross section to the start point on the second cross section.
-
When the screen matches the illustration, click to select the second cross section.
To define additional cross sections, click the Plane or Sketch step button on the command bar, which displays the Create-From Options list, to define the method for defining the cross section.
Notice the shape of the solid
-
On the command bar, click the Preview button.
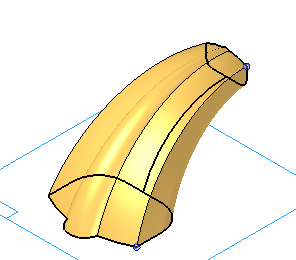
Notice how the second cross section changed the shape of the solid. The swept feature is constructed by blending the first cross section into the second cross section, while following the path.
In the next few steps, learn how the cross section start point you select affects the shape of the solid.
Change the start point for the second cross section
-
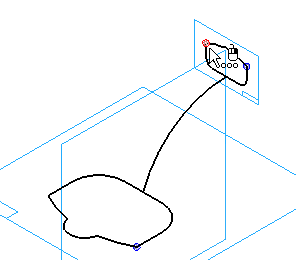
Select the Protrusion feature in PathFinder and then click the Edit Definition button.
-
On the command bar, click the Cross Section step button
. -
Select the second cross section.
-
On the command bar, click the Define Start Point button
 .
. -
Position the cursor over the vertex shown on the second cross section, then click to redefine the start point.
-
If QuickPick displays, either selection is fine.
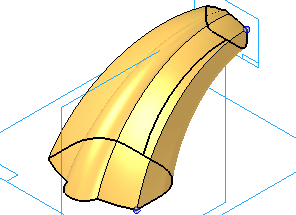
Notice the shape of the solid
![]()
-
On the command bar, click the Preview button.
Notice that the swept feature now twists to connect the start points on the first and second cross sections.
In most cases, this twisting is something to avoid. Defining the start points properly prevents twisting.
Change the start point again
-
On the command bar, click the Cross Section step button.
-
On the command bar, click the Define Start Point button
. -
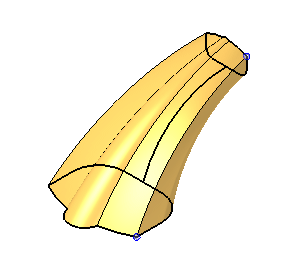
Position the cursor over the vertex on the second cross section, as shown, then click to redefine the start point back to the original location.
-
On the command bar, click the Preview button.
The swept feature should match the illustration below.
Change the Section Alignment option
-
Select the Protrusion feature in PathFinder and then click the Edit Definition button.
-
On the command bar, click the Sweep Options button
 .
.On the Sweep Options dialog box, observe the Section Alignment options.
-
On the dialog box, select the Parallel option, then click OK.
Notice the shape of the solid
![]()
Notice how changing the Section Alignment option changed the shape of the solid.
For example, the tutorial illustrations above display views of the Parallel (A) and Normal options (B) simultaneously to make it easier to observe the differences.
The Normal option specifies that the cross section sketches maintain a fixed relationship with the normal plane of the path curve.
The Parallel option specifies that the cross section sketches maintain a constant and parallel orientation to the cross section sketch plane.
Finish the feature
![]()
-
On the command bar, click the Finish button.
This simple introduction provides a basic overview of the capabilities of swept features, but there is a great deal more you can learn on your own. The system limits swept features to three paths, but you can use many cross sections.
This example shows one path that connects to both cross sections, but you will see significantly different behavior if the cross sections and paths do not intersect.
The mathematical rules behind the construction of swept features are complex; however, by experimenting with simple features like this one, you can quickly gain an intuitive understanding of their behavior.
Save the file
-
Hold the Ctrl key down, then press the M key to rotate the view to the Trimetric orientation.
-
On the Quick Access toolbar, choose Save
 to save the document.
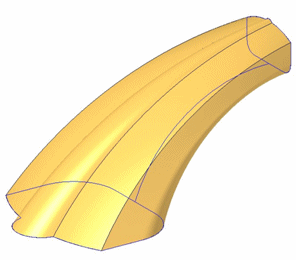
-
Read the Help topics that discuss swept features.
-
Practice constructing similar parts on your own.
© 2021 UDS