Activity: Add dimensions and formulas to control a design
Calculate the perimeter and place callouts
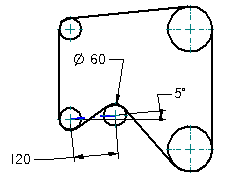
In this activity, learn how to calculate the perimeter of a drive belt and place callouts.
Launch the Activity: Add dimensions and formulas to control a design.
Open the activity file
-
Open ...\Program Files\UDS\QY CAD 2022\Training\Seddbgs.dft
-
On the Application menu, choose Save As→Save As.
-
Save the file to a new name or location so the original file is available for other users.
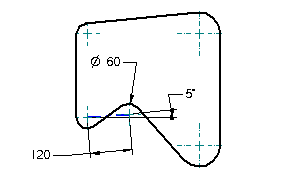
Observe the 2D sketch
When creating 2D designs to evaluate with engineering calculation tools, we recommend working with the Maintain Relationships option set and fully constrain the 2D design using driving dimensions and geometric relationships.
Designs that are fully constrained behave in a more predictable manner during the evaluation process. The 2D geometry in this document is fully constrained.
To define rules for the variables in a design, consider using the Variable Rule Editor dialog box, available on the Variable Table. Defining rules helps ensure that valid solutions are calculated quickly and invalid solutions are avoided. For this tutorial, variable limits were defined for key driving dimensions.
An effective layer management scheme can also make it easier to manage the various elements in the sketch.
For more information on dimensioning, geometric relationships, variables, and using layers, see QY CAD Help.
3D users interested in learning about using variables and the Variable Rule Editor dialog box, might benefit from the tutorial, Using Variables in Part Models.
Set the Relationships options
In this tutorial, maintain relationships, but do not display geometric relationship handles.
-
Choose Sketching tab→Relate group→Maintain Relationships
 .
.QY CAD highlights the command button.
-
Verify that the Relationship Handles option is cleared:
 .
.When the Relationship Handles option is not selected, relationship handles do not display on the drawing sheet, which reduces screen clutter.
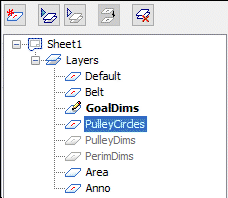
Display the Layers page
Use the Layers page to create new layers, specify an active layer, and display and hide elements according to the layer on which they reside. The symbols on the Layers page indicate whether a layer is active, displayed or hidden, and whether there are elements on the layer.
To make it easier to manage the display of elements in this design, several layers were created in this document.
-
Choose Home tab→Select group→Select
 .
. -
On the left side of the application window, click the Layers tab
 .
.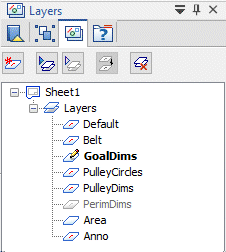
In the next few steps, hide the pulley circles and pulley dimensions, and activate a specific layer. When creating elements, QY CAD places them on the active layer.
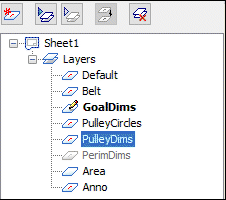
Hide the pulley dimensions layer
-
On the Layers page, click the layer named PulleyDims.
-
On the Layers pane, click Hide Layer
 .
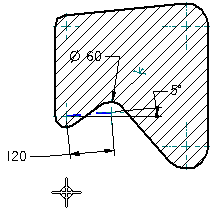
.QY CAD hides the pulley dimensions, as shown. The remaining dimensions are on another layer.
Hide the pulley circles layer
-
On the Layers page, click the layer named PulleyCircles.
-
On the Layers page, click the Hide Layer button
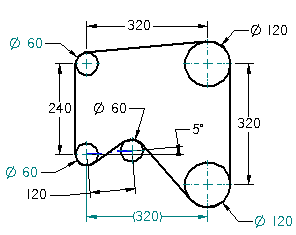
.QY CAD hides the pulley circles, as shown. The remaining elements represent the drive belt in the pulley system.

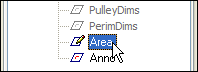
Make the Area layer the active layer
-
On the Layers page, position the cursor over the layer named Area, as shown, then double-click to make the Area layer the active layer.
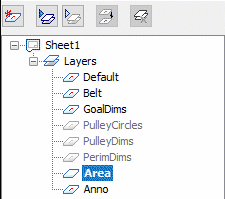
The symbol adjacent to this layer changes and the layer name becomes bold to indicate that the Area layer is now the active layer.
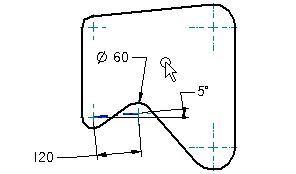
Prepare to create an area object
In the next few steps, create an area object for the lines and arcs that represent a drive belt, using the Area command.
An area object stores the area properties of a closed element. When creating an area object, QY CAD also calculates the perimeter property.
-
Choose Inspect tab→Evaluate group→Area
 .
. -
On the Area command bar, verify that the Create Area option is highlighted:
 .
.
Define the area object
-
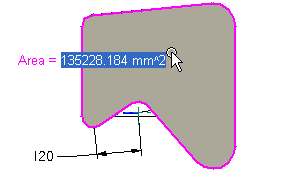
Position the cursor inside the closed shape that represents the drive belt, and then click.
QY CAD updates the display, as shown. The current area value is attached to the cursor, and the inside of the closed shape changes color.
-
On the command bar, click Accept
 .
.QY CAD updates the display again.
Save the file
-
At the top-left side of the application window, on the Quick Access toolbar, click Save
 .
.
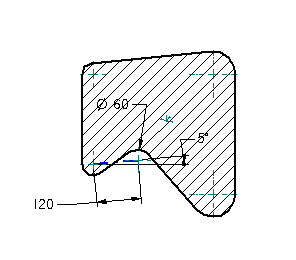
Define callout properties
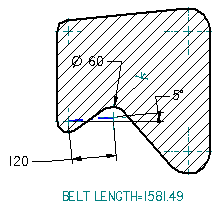
In the next few steps, create the callout shown above. The callout value will be associatively linked to the perimeter property of the area object, which displays the current belt length.
As design changes are made to the pulley and drive belt system, the perimeter value in the callout updates automatically to display the current belt length.
-
Choose Home tab→Annotation group→Callout
 .
. -
If the Preview window is open, click the Preview button at the bottom of the dialog box to close it.
-
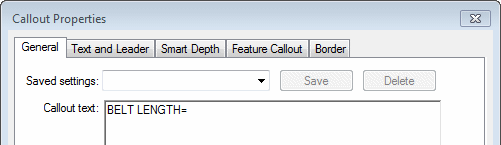
In the Callout text box, type BELT LENGTH=, as shown.
-
Click the Property Text button
 .
.
Define the property text
-
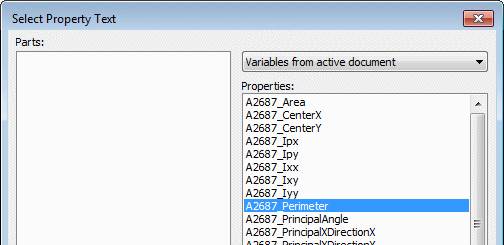
Set the first option on the dialog box to Variables from active document.

-
In the Properties list, select the Perimeter entry.
 Note:
Note:The variable numbers before the Perimeter entry may be different on your computer.
-
Click Select.
QY CAD displays the property text for the Perimeter property in the Property text box.
 Note:
Note:The variable numbers in the Property text box may be different.
Close the dialog boxes
-
In the Select Property Text dialog box, click OK.
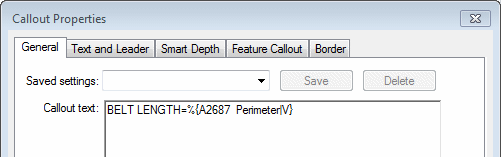
QY CAD updates the callout text.
 Note:
Note:The variable numbers in the callout text may be different.
-
Click OK.
Place the callout
-
On the Callout command bar, verify that the Leader option is cleared.
-
Position the cursor in the graphics window, approximately as shown, and then click to place the callout.
QY CAD displays the callout.
-
To end the callout command, press Escape.
Save the file
-
On the Quick Access toolbar, click Save
.In the next activity, display the pulley circles layer and change the display of the dimensions.
| Activity: Find dimension values to satisfy design requirements |
© 2021 UDS