Activity: Create a path in XpresRoute
Create a path in XpresRoute
In this activity you will place a path to be used for creating a tube. You will work in the XpresRoute environment and generate a path using the Routing Path command. You will use keypoints in the model to locate the endpoints of the path elements.
![]()
Launch the Activity: Create a path in XpresRoute.
Open the activity assembly file
-
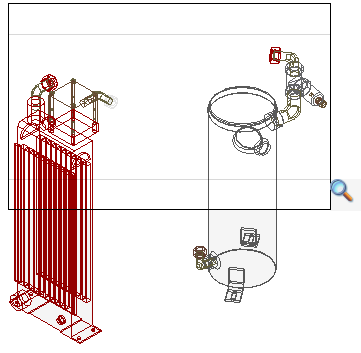
Open ...\Program Files\UDS\QY CAD 2022\Training\seaabtb.asm.
-
Click the Application button
 .
. -
On the Application menu, choose the Save As→Save As command.
-
On the Save As dialog box, save the assembly file to a new name or location so that other users can complete this activity.
Activate the parts in the assembly
![]()
-
This tutorial requires that the parts in the assembly be active. Several factors influence whether or not all parts within the assembly are active on your system.
To ensure that the parts are active, in PathFinder, right-click seaabtb.asm (or the new filename), and click Activate on the shortcut menu.
Open the XpresRoute environment
![]()
-
Choose the Tools→Environs→XpresRoute command
 .Note:
To learn more about updates to the 3D Sketch commands and Segment commands, see 3D drawing commands in Frame and XpresRoute.
-
Click OK to dismiss the message box.
Zoom in on the upper portion of the assembly
-
On the Status bar, choose the Zoom Area command
 .
. -
Click above and to the left of the assembly window, and then again below and to the right. This defines a rectangle that becomes the view area.
-
Right-click to end the Zoom Area command.
Note:For the remainder of the tutorial, use the Zoom Area, Fit, and Zoom Out commands whenever you need to set the view. You can use these commands at any time, even between steps of other commands. Right-click to exit a view command.
Start the Routing Path command
![]()
-
Choose the Home→3D Draw→Routing Path command
 .
.Routing Path quickly creates a 3D path for a tube part without having to manually draw the individual lines of the path. Routing Path generates a path between two points that is orthogonal to the default reference planes. These points must be circular or elliptical features on a part or the endpoint of a tube segment or sketch element.
In cases where there are multiple ways to construct the tube path, the command allows you to visually scroll through these possibilities.
Examine the Routing Path command bar
![]()
Routing Path provides options as you work through commands. The options always display information and choices about what is happening at the moment. Beginning at the left side, examine the current options:
![]() The Activate Part button activates the selected part.
The Activate Part button activates the selected part.
![]()
![]() You can use the Previous and Next buttons to preview the available path choices. The order of the paths goes from the simplest path, with the least number of segments, to the most complex path. The maximum number of segments in a path that Routing Path generates is five.
You can use the Previous and Next buttons to preview the available path choices. The order of the paths goes from the simplest path, with the least number of segments, to the most complex path. The maximum number of segments in a path that Routing Path generates is five.
The Port Segment Length box specifies the length of the segments at the end of the ports. This option does not display until you have defined one end for a new tube.
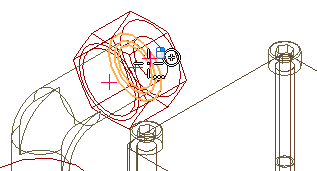
Select the first point for the path
-
Position the cursor over the fitting, then use QuickPick to select the outermost circle, as shown. When the outermost circle is highlighted, click.
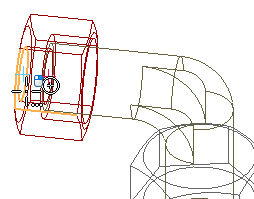
Select the second point for the path
-
Position the cursor over the fitting shown. When the circle is highlighted, click.
Change the port segment length
![]()
-
On the Routing Path command bar, in the Port Segment Length box, type 40. Press Enter to increase the length of the segment connected to each port.
View the path choices
![]()
-
Click the Next button
 .
.Notice that another path choice is shown and the Previous button is activated. You can now step back and forth through the available path choices. Continue to click the Next button until the path shown next is displayed.
Finish the path
![]()
-
On the command bar, click
 , then click Close 3D Sketch.
© 2021 UDS