Hole Number tab (Hole Table Properties dialog box)
The read-only data cells on the Hole Number tab show the actual hole information displayed in the hole table.
Although you cannot edit the data in the data cells, you can make the following changes to the hole table and hole annotations:
-
Change the hole order using the row controls. This also renumbers the holes.
-
Edit the hole origin or size labels using the Origin/Size list.
-
When your hole table has multiple origins, or the holes are listed by hole size with each hole size shown, there are multiple entries in the Origin/Size list. You can use the Origin/Size list to reorder the hole data according to the currently selected origin, or you can choose which set of hole sizes to show in the table.
- Origin/Size
-
Specifies how you want to organize the hole table data. You can list the hole data by hole origin labels (for example, 1, 2, 3) or hole size labels (for example, A, B, C). This also affects how many rows are displayed.
The Hole column in the table updates to list the holes belonging to the selected origin or hole size group.
Example:When List holes by origin is selected on the Options tab, and the Origin/Size list is set to 1, the Hole column looks like this:
Hole
Origin/Group
Distance
1.1
1
2.304 in
1.2
1
2.304 in
1.3
1
2.304 in
Example:When List holes by size is selected on the Options tab, and the Origin/Size list is set to A, the Hole column looks like this:
Hole
Origin/Group
Distance
A.1
A
2.304 in
A.2
A
3.247 in
A.3
A
4.208
Example:You can change the label shown in the Origin/Size list from A to AA, or from A to B. Type the letters that you want and press Tab or Enter to apply the change to the table data shown on the Hole Number tab. If you also click Apply, the changes are applied to the table and the annotations on the drawing.
You can change the origin numbers shown in the Hole column using the same technique.
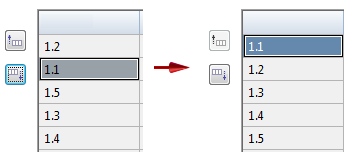
- Relabel List
-
When you move rows up or down, the hole sequence numbers get out of order. Use this button to update all of the hole sequence numbers from top to bottom, starting with 1.

- Move Row Up
-
Moves the selected hole up one row in the table. This updates the hole numbers in the data grid and in the hole table.
- Move Row Down
-
Moves the selected hole down one row in the table. This updates the hole numbers in the data grid and in the hole table.
Use the Apply button to apply your changes to an existing hole table and annotations on the drawing.
© 2021 UDS