Place a coordinate dimension using a coordinate system
User defined coordinate systems can be created in the model using the Coordinate System command. Coordinate dimensions can reference a user defined coordinate system or the base coordinate system.
-
Perform the following steps before you place the dimensions.
-
Right-click the drawing view and choose Properties.
-
On the General tab (Drawing View Properties dialog box):
-
From the View Coordinate System list, select a coordinate system.
-
From the Axis list, choose a dimension axis.
When placed, the coordinate dimension lines are displayed perpendicular to this axis. Refer to the examples, below.
-
-
-
Choose the Coordinate Dimension command
 .
. -
On the Dimension command bar, from the Orientation list, select Use Coordinate System.
-
Click an element that you want to be the dimension origin.
-
Click to place the common origin.
In the examples below, this is the 0 origin label, which is displayed on the dimension axis selected in step 1.
-
Click an element that you want to measure.
-
Click to place the dimension.
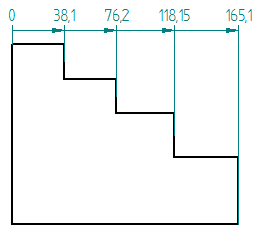
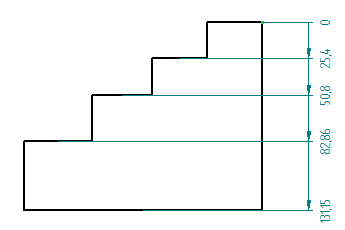
The following examples show the difference between coordinate dimension lines displayed perpendicular to the X axis and the Y axis for a selected coordinate system.
| Coordinate system axis | Dimension line orientation |
| Y axis | Dimension lines are perpendicular to the Y axis.
|
| X axis | Dimension lines are perpendicular to the X axis.
|
-
You can display a coordinate system or center of mass in a drawing view using the Display tab (Drawing View Properties dialog box).
-
By default, the coordinate system is displayed as point in the drawing view. You can define a custom coordinate system by creating the coordinate system graphics and saving them as a block. For more information, see Define a custom center of mass or coordinate system for a drawing.
© 2021 UDS