Activity: Using docking windows
Activity - Using docking windows
Learn how to reposition docking windows using docking stickers.
Launch the Activity: Using docking windows.
Open a part file
-
Click the Application button
 .
. -
On the Application menu, click New→New.
-
From the Standard Templates list, click ISO Metric or ANSI Metric, and then click the new part file icon labeled, for example, iso metric part.par.
An empty QY CAD part document is created. The file shown below is based on an ISO template. It is opened in the synchronous environment.
Note:-
The locations of the windows referenced in this activity vary with the work space theme that is selected and with the version of QY CAD that you are using. The windows may be arranged on the right or the left side of the application window, or along the top or bottom. They may be collapsed into a tab or fully expanded.
-
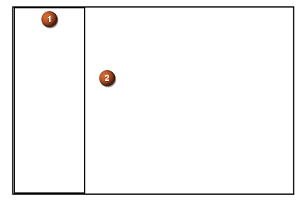
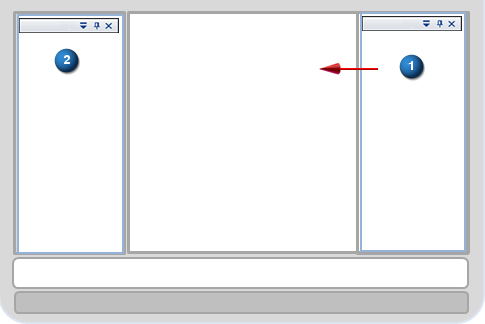
The following example shows the initial window arrangement when you are using the theme, Balanced—QY CAD Default. Tool panes are open and pinned at left (1). Transparent PathFinder is located alongside (2).

-
For this activity, create a new part file.
Dock a window along the perimeter of the application window
-
Position the cursor on the title bar of the PromptBar window.

-
Click+drag the PromptBar window toward the right side of the QY CAD application window.
-
When the cursor is positioned over the docking sticker along the right side, observe the shaded preview, and then release the mouse button.
 Note:
Note:When you use a docking sticker located along the perimeter of the application window, the docking window you are moving extends to the full height (or width) of the application window. Other docking windows are shortened to accommodate it.
-
Return PromptBar to its initial position and size by doing the following:
-
Place your cursor on the title bar of PromptBar and drag it toward its original location.
-
When the docking sticker along the perimeter of the window activates, release the mouse button.

-
Docking stickers located at the perimeter of the overall application window provide precise docking along the top, bottom, left, and right sides of the application window. A shaded rectangle shows a dynamic preview of the window extent and location as you drag an eligible window over a docking sticker.
The locations of the windows referenced in this activity vary with the work space theme that is selected and with the version of QY CAD that you are using. They may be arranged on the right or the left side of the application window, or along the top or bottom. They may be collapsed into a tab or fully expanded.
Dock a window inside another window
-
Locate the Layers tab
 or window (1).
 -
Turn off Auto-Hide mode (2).
-
Position the cursor in the title bar of the Layers window (3).
-
Drag the Layers window toward the center of the graphics window. Notice the group of docking stickers that appears there.
-
Move your cursor over each of the docking stickers and observe how the window preview changes.
-
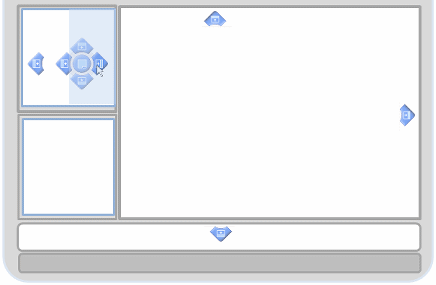
When the cursor is positioned over a docking sticker that points to the right, and the preview is displayed as shown in the following illustration, release the mouse button.

-
-
Drag the Layers window back to its original position in the application window. To do this, use the docking sticker that points to the left, as shown in the following illustration.

Docking stickers that appear in a group at the center of the graphics window or another eligible container window provide precise docking within that container.
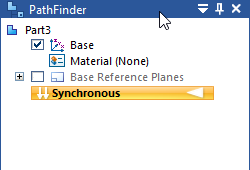
Depending on the work space theme you are using, the Layers window may be collapsed to a tab alongside the application window, or it may already be open and pinned in place. When pinned, the Layers tab is displayed in a docking window along with related tabs, such as the Family of Parts tab and the Sensors tab.
Docking sticker groups are available in other windows, as well as in the center of the application window.
Add a docking window as a tab
-
Verify that the destination window (the window that contains the Layers tab, among others), is open and pinned in place, as shown in the following illustration. If it is not, turn Auto-Hide mode off.
-
In the theme Balanced—QY CAD Default, PathFinder is displayed as a transparent pane in the graphics window. In this mode, the docking pane controls are hidden.

To be able to add PathFinder as a tab to another docking window:
-
On the Quick Access Toolbar, click Options to open the QY CAD Options dialog box.

-
On the Helpers tab, in the General section, deselect the check box, Show PathFInder in the document view, and click Apply.
The the docking pane controls are now visible, and the pane is pinned.
-
-
Position the cursor in the title bar of the PathFinder window (1), and then click+drag it into the destination window (2).
-
When the following group of docking stickers is displayed inside the destination window, move your cursor onto the round sticker at the center of the group.

-
As you do this, a shaded preview of the new tab is displayed inside the destination window.

-
Release the mouse button.
PathFinder is added as another tab to the tab set. You can scroll through all of the tabs in the tab set using the right and left arrow buttons.

-
You can separate the tabs into individual windows by dragging the tab instead of the title bar.
For example, to detach the PathFinder window from the tab group and move it to another position, place your cursor on the PathFinder tab (shown in red outline in the previous image), and click+drag it onto a docking sticker in the window.
You can add a docking window as a new tab to a docking window that already contains a tab group. To do this, you can use the round docking sticker at the center of a docking sticker group.
You will add the PathFinder window as a new tab to the window that contains the Layers tab, among others. This is the destination window.
To undo any unintended changes you make to your docking pane containers when you drag them and pin them in different configurations:
-
On the Quick Access toolbar, click the Customize arrow
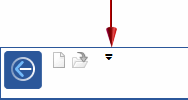 , and then choose Customize
  .
. -
In the Customize dialog box, in the Themes section, click the Reset Docking Panes button.
Restore a closed docking window
Experiment further with docking windows by following the instructions below.
Reopen a closed window
To restore windows that you closed using the Close control  and cannot find, use one of the following techniques.
-
Choose View tab→Show group→Panes
 , and from the menu, select the name of the docking window that you want to reopen.
 -
In any of the other open docking windows, click the Display Docking Window Menu button
 , and then select the name of the docking window that you want to reopen.
Float a window
When you drag a docking window outside the application window, it becomes an independent (floating) window.
To float a window, do one of the following:
-
Double-click the title bar of a docked window.
-
Press the Ctrl key while dragging the window.
Tip:Pressing the Ctrl key enables you to float the window near a border, in a position that would otherwise result in the pane being docked.
Return a floating window to the last position
To return a floating window to the last position, double-click the title bar of the floating window.
Turn off docking stickers
To turn off the docking stickers, press Ctrl as you drag the docking window.
Summary
In this activity, you learned how to use docking stickers to manage the windows in your work space.
-
Docking windows can be added to or grouped with other windows, or they can be moved so that they float alone. When a docking window is dropped into a suitable container window, the tools of the dropped window are added to the container window, and the icon representing the newly dropped window is displayed in the tab set.
-
Examples of docking windows include PromptBar, the command bar, Feature Library, and the Simulation pane, as well as each tabbed pane within the container window.
-
Each docking window has its own set of controls, which you can use to auto-hide, size, collapse vertically or horizontally, and close the window.
-
There is also a set of globally available docking stickers, which you can use to precisely reposition docking windows. These are displayed only when you are moving a docking window.
Single-pane containers are docking panes that cannot be placed inside a multiple-page container and do not respond to docking sticker cues.
© 2021 UDS