Suppress individual loads to compare results
You can evaluate the effect of individual loads and constraints on study geometry by turning them off and on. When you solve the study, the boundary conditions that are suppressed are not processed. Suppressing and then unsuppressing one or more loads, constraints, or combinations of loads and constraints simulates the part undergoing all of the loading conditions in the study, but not all at the same time.
-
Create three loads in the same simulation study, for example, Force 1, Force 2, Force 3.
-
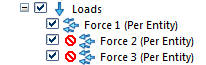
In the Simulation pane, expand the Loads node, and then use the Suppress command on the shortcut menu to suppress two of the three loads you created.
The suppressed icon
 indicates the loads that will not be evaluated in the simulation results.Example:
Suppress loads Force 2 and Force 3, leaving Force 1 load active.
-
Right-click the study name, and choose Solve
 .
.You do not have to mesh the study again; it does not go out of date when you suppress loads and constraints.
When processing completes, the study results are displayed in the Simulation Results environment.
Tip:You can use the Home tab→Output Results→Create Report command to document the results of the first load case that you processed. To learn how to do this, see Report simulation results.
After you review the results, click Close Simulation Results.
-
Now change the loads that are suppressed and unsuppressed, and solve the study again. Use the Unsuppress command on the shortcut menu of a load that is suppressed.
Example:Solve for Force 2, but suppress Force 1 and Force 3.

-
Repeat Step 4 for the third load case.
Example:Solve for Force 3, but suppress Force 1 and Force 2.
Use the following process to compare individual loads or constraints within the same simulation study.
© 2021 UDS