Rib command
Use the Rib command  to construct a rib by extruding a profile. The Direction and Side steps allow you to control the shape of the rib.
Constructing a synchronous rib feature
When you choose the synchronous Rib command, the command bar guides you through the following steps. The Rib command requires an existing sketch.
| Step 1. | Select Step—Select the sketch elements that define the rib feature. |
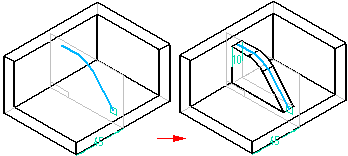
| Step 2. | Rib Thickness Step—On the dynamic edit box, type in the rib thickness value and press Tab. |
| Step 3. | Extent Step—Option to extend the ends of the sketch elements until they intersect the part. |
| Step 4. | Finite Depth Step
|
| Step 5. | Alignment Step—Define the side of the sketch to create the rib on. |
| Step 6. | Side Step—Use the steering wheel to define direction for the rib. |
| Step 7. | Finish Step—Click the Accept button to create the feature. |
Constructing an ordered rib feature
When you select the Rib command, the command bar guides you through the following steps:
| Step 1. | Plane or Sketch Step—Define the profile plane for the rib or specify that you want to use an existing sketch. |
| Step 2. | Draw Profile Step—This step automatically activates when you define the reference plane for the rib. When editing a rib, you can select this step to edit the rib profile. |
| Step 3. | Direction Step—Define the direction you want to project the profile to form the body of the rib. |
| Step 4. | Side Step—Define the side to which you want to offset the profile to form the thickness of the rib. Note: By default, all ribs offset symmetrically. If you do not want the rib offset symmetrically, click the Side Step button, and define the side of the profile you want to offset. |
| Step 5. | Finish Step—Process the input and create the feature. |
© 2021 UDS