Create a user-defined detail view
-
Choose the Home tab→Drawing Views group→Detail command
 .
. -
(Specify detail view type) On the Detail command bar, do one of the following:
-
To create an independent detail view, click the Independent Detail View button
 .
. -
To create a dependent detail view, turn off the Independent Detail View button
 .
.
-
-
(Specify detail view envelope shape) The default detail view shape is circular. To use a different shape, click the Define Profile button
 .
. -
Click the source drawing view that you want to detail.
The Line command bar is displayed.
-
(Draw the profile) Do the following:
-
On the command bar, select the Line option to draw a linear detail envelope, or select the Arc option to draw a curved detail envelope.
-
In the source drawing view, draw a 2D shape around the area that you want to detail.
-
On the ribbon, choose Home tab→Close group→Close Detail Envelope.
-
-
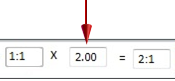
The detail view scale and formula are shown on the command bar. To make the detail view larger or smaller, change the value in the Multiplier box.
-
Move the cursor to position the detail view, and then click to place it on the drawing.
The graphics enclosed by the detail envelope are displayed in the detail view.
- To modify the detail view
-
-
After the detail view is placed, click the detail view border to edit scale, show or hide the detail view caption, and change display mode using the options on the Drawing View Selection command bar.
-
You can modify the default content of the caption on the detail view by clicking the Properties button on the command bar, and then making changes using the Caption tab (Drawing View Properties dialog box).
-
- To modify the detail envelope
-
-
You can edit the detail envelope attributes by clicking the envelope in the source view, and then setting options on the Detail Envelope Selection command bar.
-
You can modify the default content and formatting of the detail envelope caption by clicking the Properties button on the command bar, and then making changes using the Caption tab in the Detail Envelope Properties dialog box.
-
© 2021 UDS